How to Use BSL Shaders: Complete Guide
If you want a shader pack that keeps Minecraft’s familiar blocky world but makes it look more realistic, BSL Shaders stands out. It transforms vanilla Minecraft with realistic shadows, atmospheric lighting, reflective water, and customizable clouds. However, the default BSL configuration can look hazy, reduce visibility, or throw off the balance of lighting, water, shadows, and colors. So, we’ve made this guide on how to use BSL Shaders. Learn how to fine-tune this shader pack for better visuals and smooth gameplay, with optimized settings for low-end, mid-range, and high-end PCs using Iris or OptiFine.
How to Set Up BSL Shaders in Minecraft
BSL Shaders needs a shader loader to run, so the setup involves three main steps. Install Iris or OptiFine, download BSL Shaders, and activate the pack in Minecraft.
1. Install a Shader Loader
BSL Shaders supports both Iris and OptiFine. However, Iris is recommended for newer Minecraft versions, whereas OptiFine is great for older ones. Always check that your chosen loader supports your Minecraft version before installing.
- Iris: Iris is recommended for current versions. Download the Iris Installer from the Iris Shaders website, close Minecraft and your launcher, run the installer, and choose your game version. The latest link installs Iris and Sodium together.
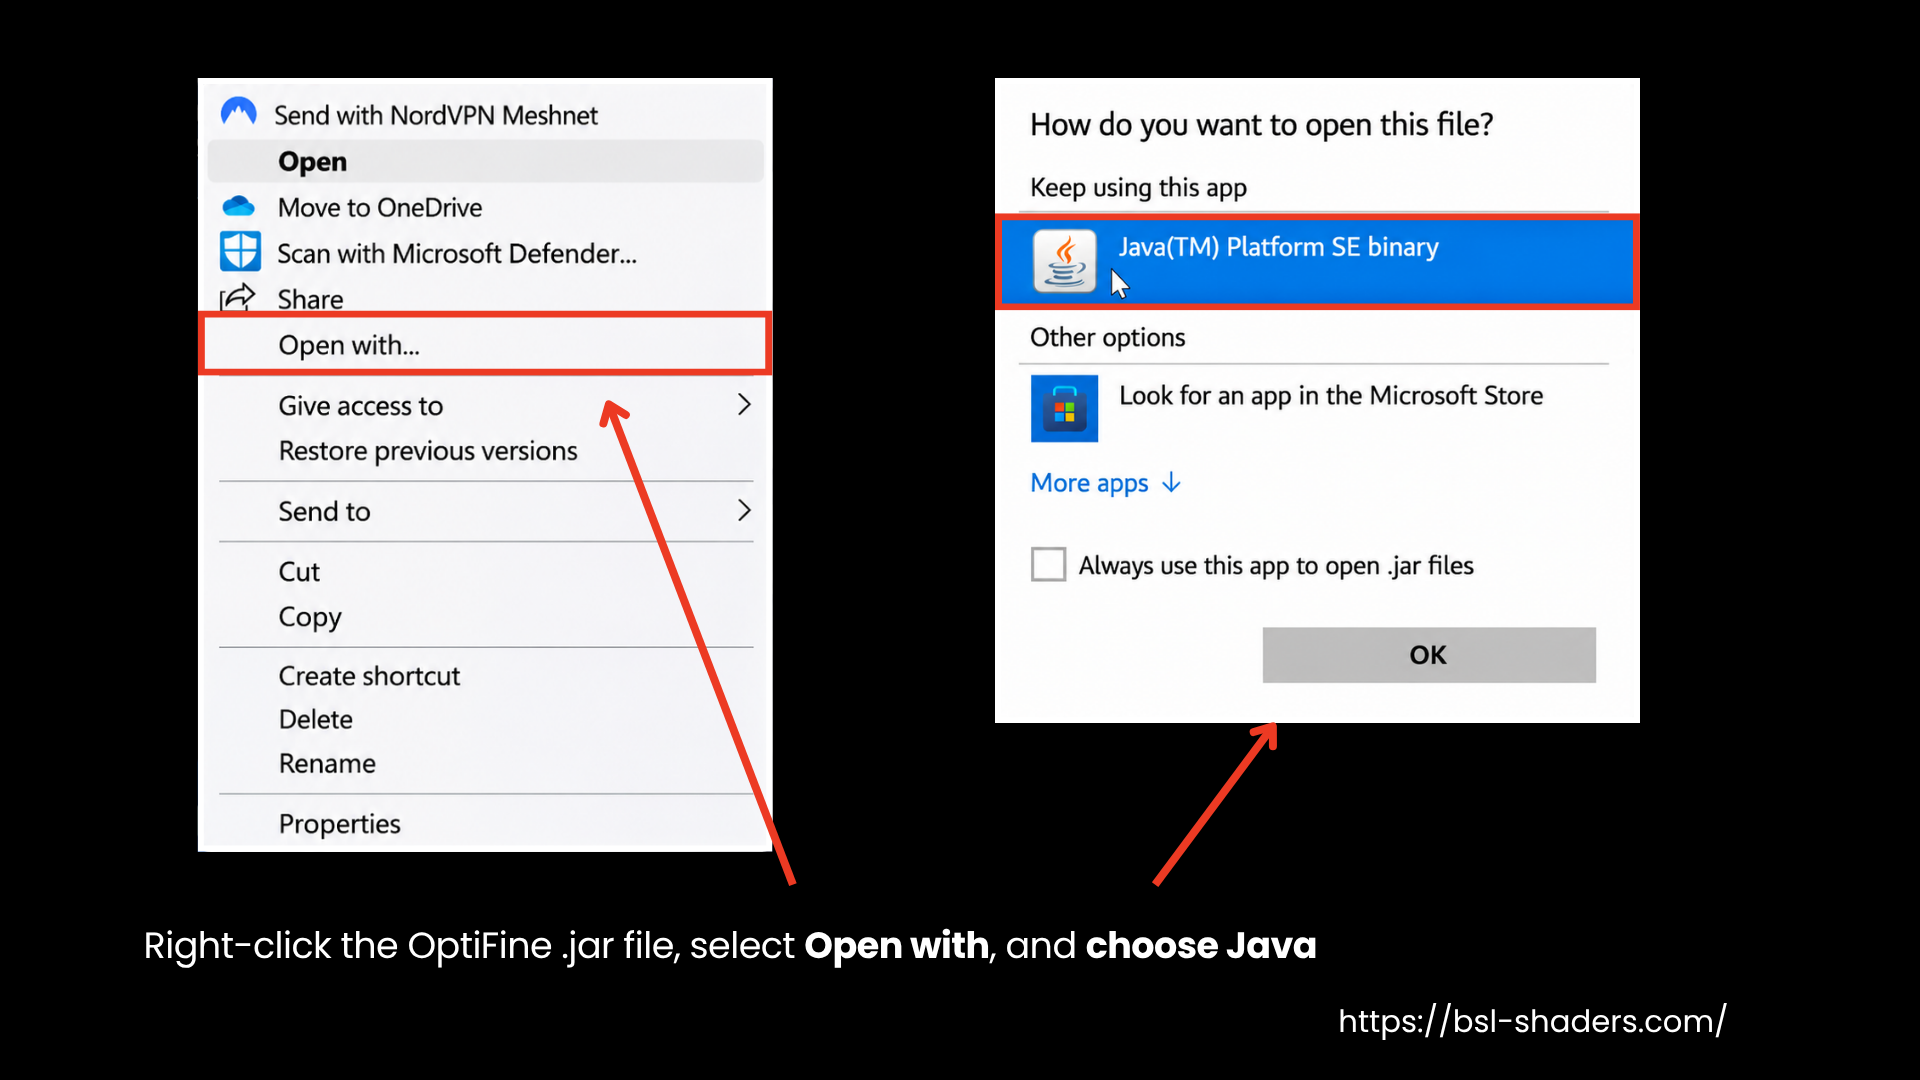
- OptiFine: Download a compatible version from OptiFine.net, run the .jar installer, and install the OptiFine profile. If it will not open, right-click it, choose Open with, and pick Java(TM) Platform SE Binary.
2. Download BSL Shaders
- Download BSL Shaders from the official site or Modrinth or CurseForge. Open the Versions tab on Modrinth or the Files tab on CurseForge.
- Pick the file that matches your Minecraft version and loader. For example, if you have Minecraft version 26.1.2, choose the 26.1.2 build with the Iris or OptiFine option.
- Download the .zip file and do not extract it.
3. Add the Shader Pack to Minecraft
- Open the Minecraft Launcher, select the profile your installer created (the Iris profile or the OptiFine profile) in the menu beside the Play button, and click Play. Wait for the main menu to load.
- Go to Options > Video Settings and open Shader Packs or Shaders.
- Click Open Shader Pack Folder or Open Shaders Folder.
- Drag the BSL .zip file into that folder.
- Return to Minecraft. Select BSL Shaders from the shader list.
- Click Apply or Done, depending on the menu.
- Load a world and wait a few seconds for Minecraft to compile the shaders on first launch. Keep it at default or configure BSL Shaders as needed.
How to Use BSL Shaders for Minecraft Java
BSL keeps Minecraft’s vanilla block textures while transforming the game’s lighting and visual effects, from shadows and god rays to bloom, with plenty of customizable settings. Its default features include real-time shadows, volumetric lighting, bloom, ambient occlusion, customizable clouds, and water. You can also use its built-in features like anti-aliasing, while optional effects include depth of field, motion blur, specular and normal mapping, cel-shading, and world curvature. Its profiles help lower-end PCs run the pack, although performance depends on your hardware.
Open Shader Pack Settings and Choose a Profile
Go to Options > Video Settings > Shader Packs, select BSL, and click Shader Pack Settings.
| Profile | What it turns on |
|---|---|
| Minimum | No shadows and no extra effects |
| Low | Low shadows and no extra effects |
| Medium | Low-medium shadows and ambient occlusion (AO) |
| High | Medium shadows, ambient occlusion, light shafts, and TAA |
| Ultra | High shadows, ambient occlusion, light shafts, and TAA |
You can find the Profile at the top. A higher profile is not automatically better, so pick the highest one that keeps your frame rate steady. Here’s a quick overview:
- Low-end PCs: Start with Minimum or Low.
- Moderate PCs: Start with Medium.
- High-end PCs: Use High, then test Ultra if frame rates stay smooth. As a reference point, the high-end values in this guide come from a tutorial that treated a Lenovo Legion 5 laptop with an RTX 3060 (6GB) and a Ryzen 5800H as the minimum.
After you choose a profile, you can customize further using the eight tabs, namely Lighting, Material, Environment, Camera, Color, Color Grading & Tonemap, Anti-aliasing, and Extras. We have given recommended settings for each below, but hover over any setting to read its description. Menu names and options can differ between BSL versions, so treat every number as a starting point.
Lighting (Shadows and Ambient Occlusion)
Shadow Map Quality sets how sharp shadows look, and Shadow Distance sets how far they render, so both affect frames per second (FPS).
- Low-end PCs: Set Shadow Map Quality to Low and Shadow Distance to around 120. Keep Ambient Occlusion off and turn Entity Shadow and Cloud Shadow off under More Shadow Config.
- Moderate PCs: Set Shadow Distance to 256, turn on Shadow Filtering, and set Shadow Map Quality to Medium. Turn Ambient Occlusion on and set AO Strength between 1.0 and 1.5 in Ambient Occlusion Config.
- High-end PCs: Try a Shadow Distance of 512, set AO Strength to 1.5, and set Shadow Map Quality to High.
- Every PC: Set Desaturation Factor to Low or its lowest value and keep Multi-Colored Blocklight off. Sun Path Rotation in More Shadow Config changes the sun's path, so set it to your preference or start at 0. Keep Entity Shadow off on moderate and high-end PCs too for clear visuals.
Environment (Light Shafts, Fog, Clouds, Sky and Water)
The Environment tab further contains Clouds, Fog, Sky, Skybox, Water, Animations, Light Shafts, and Per Biome Weather configurations. Here’s a quick starting point:
- Low-end PCs: Turn Light Shafts off, since they can significantly lower the frame rate.
- Moderate PCs: Turn Light Shafts off or keep them on and set the strength to 0.25 in Light Shaft Config to cut glare.
- High-end PCs: Keep Light Shafts on if you like the atmosphere, but turn them off if you want clarity.
- Every PC: Lower Overworld Fog Density, Nether Density, and End Density toward 0 for a clearer view. Turn Far Vanilla Fog off or set it to Minimal for a clear view at a distance. Set Clouds to Vanilla for a subtle visual upgrade, or keep BSL’s default clouds on a high-end PC if you like them. In Skybox, set Aurora to Full to allow northern lights to appear. The Per Biome Weather setting gives each biome its own weather colors, while turning it off lets auroras show in every biome, so choose based on your preference. Enable Shader Sun & Moon before changing Sun & Moon Shape. Leave Shader Sun & Moon off to keep the sun and moon from your resource pack.
- Water: Set Water Texture Mode to Flat Vanilla or Tinted Vanilla and Water Alpha Mode to Vanilla for a more traditional Minecraft look. Set Detail between 25% and 40%.
Quick Settings Explanation: Ambient Occlusion (AO) adds shading to creases and corners, while Light Shafts create visible sun rays.
Material (Reflections, Emissive and Resource Pack Effects)
The Material menu includes Advanced Materials, Specular & Reflections, Normals & Parallax, and Emissive. Advanced Materials is off by default because specular and normal-map effects can reduce performance. Some features, including Rain Reflection, also depend on it.
- Low-end PCs: Leave Advanced Materials off, set Reflections to Off or Sky and Specular Only, and keep Emissive off.
- Moderate PCs: Keep Advanced Materials off unless your resource pack includes specular or normal maps, as it can reduce FPS. Turn Translucent Reflections off so glass does not flare in sunlight. Since Rain Reflection depends on Advanced Materials, leave it unchanged while Advanced Materials is off. Set Puddle Amount to Very Low if you want fewer reflections.
- High-end PCs: With a PBR resource pack, turn Advanced Materials on, set Refraction to Full, and turn labPBR Albedo Metal on. Then open Material > Normals & Parallax and set Parallax Samples to 512, Self Shadow Samples to 32, Directional Lightmap to On, Parallax Depth to 25 cm, and Up-facing Plants to Off.
Camera (Bloom, Lens Flare and Blur)
Bloom creates a glow around bright objects such as torches and the sun. BSL's strong default bloom contributes to its soft, dreamy appearance. Depth of Field blurs objects outside the focus point, making it more useful for screenshots than regular gameplay.
- Low-end PCs: Turn Bloom, Lens Flare, Vignette, Motion Blur, and Depth of Field off.
- Moderate PCs: Keep Motion Blur and Depth of Field off, set Bloom Strength to 0.25, and turn Lens Flare and Vignette off.
- High-end PCs: Adjust Bloom Strength and Bloom Radius to your preference. If you like lens flare, set its Strength to 0.50. Enable Depth of Field for screenshots rather than everyday gameplay.
- Every PC: Raise Bloom Contrast for a sharper image.
Color, Color Grading & Tonemap (Brightness and Vibrance)
Color covers Lighting Color, Blocklight Color, Atmosphere Color, Water Color, and more. No single set of Color Grading & Tonemap values suits every PC or visual preference, so start with one of the looks below rather than combining several presets.
| Look | Suggested values (and leave the rest at default) |
|---|---|
| Clear and crisp | Tone Map Upper Curve 1.2 and Tone Map White Curve 4.0 |
| Vibrant and vanilla-friendly | Classic Exposure On, Tone Map Upper Curve 1.1, Saturation 1.15 and Vibrance 1.45 |
| Natural and balanced | Saturation 1.05 and Vibrance 1.10 |
| Warm and cozy | Color Grading On, Tone Map Upper Curve 1.1, Saturation 1.05 and Vibrance 1.05 |
Three more settings can improve visibility and balance any BSL look:
- Brighten caves: Turn on Classic Exposure to make caves and interiors easier to see.
- Keep shadows visible: Go to Color > Lighting Color > Minimum Light and set Intensity to 0.6.
- Reduce excessive brightness: Under Lighting Color, lower Intensity for the current time of day. Avoid changing the color sliders, as they tint the light.
If your screenshots are too bright, turn off Auto Exposure and adjust Exposure manually. If colors look too intense, lower Saturation and Vibrance first.
Anti-Aliasing and Extras
The Anti-aliasing menu has FXAA and TAA (temporal anti-aliasing). Both smooth jagged edges, and running both can reduce FPS.
- Low-end PCs: Use FXAA only, or turn both off if FPS drops.
- Moderate PCs: Leave both at their default settings for the profile you choose.
- High-end PCs: Turn both on. High and Ultra profiles already include TAA.
- Extras: Leave the settings at their defaults.
BSL Shaders Recommended Settings Checklist by PC Type
Use this table as a quick checklist, then change one setting at a time until the frame rate suits your PC and GPU:
| Setting | Low-end | Moderate | High-end |
|---|---|---|---|
| Profile | Minimum or Low | Medium | High, test Ultra |
| Shadow Map Quality | Low | Medium | High |
| Shadow Distance | About 120 | 256 | 512 |
| Ambient Occlusion | Off | On, 1.0 to 1.5 | On, 1.5 |
| Light Shafts | Off | Off, or on at strength 0.25 | On |
| Reflections | Off or Sky and Specular Only | Default, with Translucent Reflections off | Full |
| Bloom | Off | Strength 0.25 | Adjust |
| Entity Shadow | Off | Off | Off or on |
| Clouds | Vanilla | Vanilla | Vanilla or BSL clouds |
| Advanced Materials | Off | Off unless your pack has specular or normal maps | On with a PBR pack |
| Lens Flare and Vignette | Off | Off | Adjust |
| Fog Density | Toward 0 | Toward 0 | Toward 0 or to taste |
| Depth of Field and Motion Blur | Off | Off | Depth of Field for screenshots only |
| Anti-aliasing | FXAA only | Defaults | FXAA and TAA |
| Minecraft render distance | 8 chunks or less | Adjust | Adjust |
Wrapping Up!
Overall, to configure BSL Shaders settings, hover over any option in Shader Pack Settings to read its description, or click it to see the changes in real time and adjust it to your liking. The main thing is to match your profile to your GPU and target FPS. Once you find your favorite BSL Shaders settings, save them using Export Applied Settings File so you can reuse them after changing PCs, updating Minecraft, or installing a resource pack.
Frequently Asked Questions
1. How do you make BSL Shaders less laggy?
Choose the Minimum or Low profile, disable Light Shafts, reduce Shadow Distance to around 120, and keep render distance at 8 chunks or less. Use Iris with Sodium and try to avoid full-screen mode.
2. How do you make BSL Shaders less blurry?
Go to Camera and lower Bloom Strength or Bloom Radius, or increase Bloom Contrast. For less haze, set Tone Map White Curve to 4.0 and Tone Map Upper Curve to 1.2.
3. Why is BSL different from other shader packs?
BSL combines warm colors, bright days, and dark but readable nights with extensive in-game customization, so you can adjust most effects without editing config files.
4. How do you export and import BSL Shaders settings?
With Iris and Sodium, switch to windowed mode, open BSL's settings, and select Export Applied Settings File at the top. On the other PC, install the same shader pack and select Import Settings From File at the top, then choose the exported file.
5. What are the best aesthetic BSL Shaders settings?
For a bright, soft look, disable Entity Shadow, Emissive, and Vignette. Set Water Texture Mode to Tinted Vanilla, Tone Map Upper Curve to 1.2, Saturation to 1.10, and Vibrance to 1.25.
6. How do you use resource packs with BSL Shaders?
Install Iris or OptiFine, place your resource pack in the resourcepacks folder, and enable it under Options > Resource Packs. Select BSL under Shader Packs. For specular and normal maps, enable Advanced Materials under Material.
7. How do you make BSL Shaders darker?
Under Color > Lighting Color, lower Intensity for the current time of day. You can also reduce Exposure under Color Grading & Tonemap or disable Light Shafts.
8. Should you change render quality or shadow quality?
In OptiFine, lowering Render Quality can help performance. Use built-in FXAA or TAA instead of increasing render quality for smoother edges. Adjust Shadow Map Quality or Shadow Distance under Lighting rather than changing the shader screen's shadow quality.
9. How do you configure BSL Shaders using a settings file?
Run Minecraft once with BSL Shaders enabled to create a .txt settings file in the shaderpacks folder. Replace its contents with the copied settings text, or replace it with a downloaded settings file renamed to match the original. Press R in-game to reload BSL and apply the changes.